Thursday, April 7, 2011

Assignment2

Alrite..i'll be roughly stated here that what I am going to do in Assignment2, previously i had create in assignment1 using ''1MALAYSIA'' concept, and i used Negaraku lyrics (National Anthem)...so now assignment I'll be also using National Anthem for my Assignment 2, Computer graphic 3...


First of all,I start with using photoshop for creating my background.

1st, when u go in...u'll see a white background then u used Gradient tool to do gradient background.


2nd , you'll up left side that i marked red arrow which can choose colour

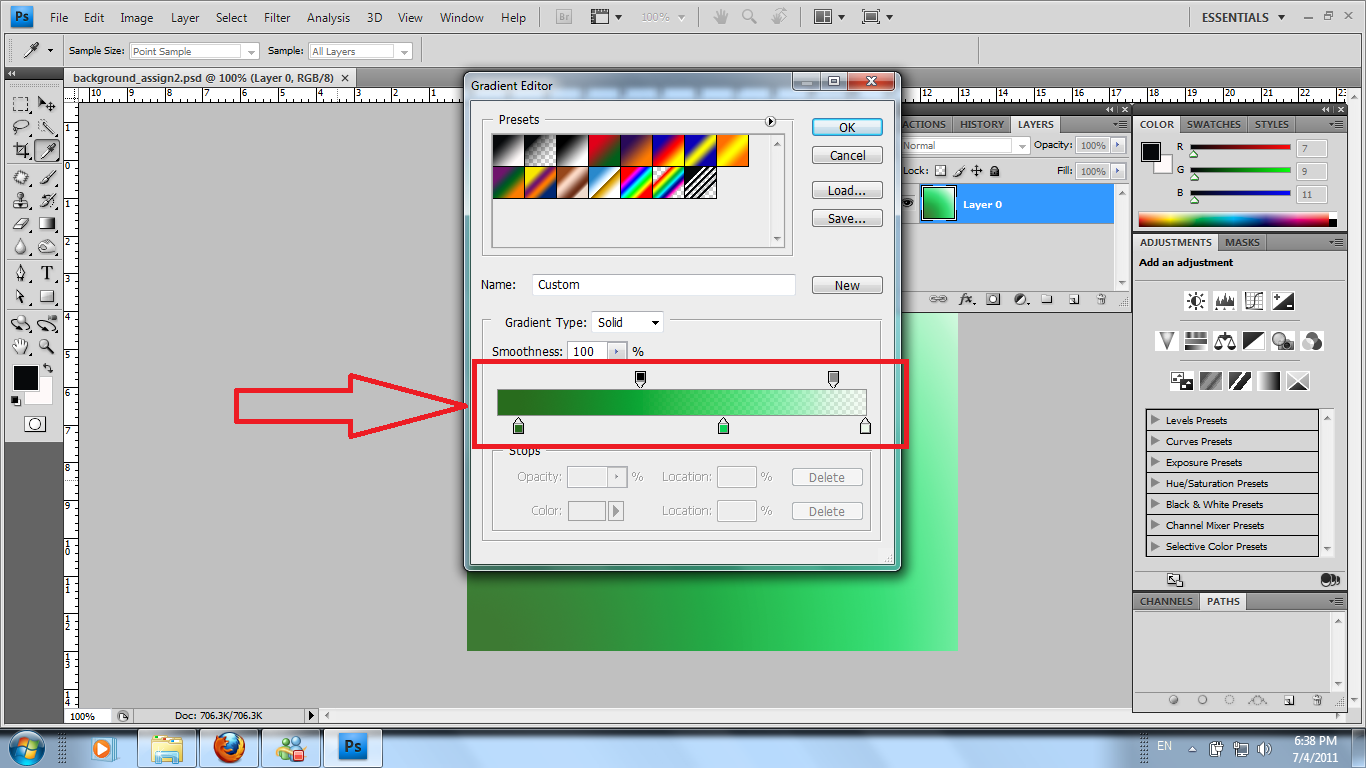
 Later, after clicked on it..it would poped out Gradient Editor and from there u can choose your colour wisely....i chose green instead

 Then, pull the background from the photoshop to your FLASH file, hey adobe photoshop and flash is 1 family, you cant used flash or photoshop alone to make a perfect product out.Alrite now you can see what i highlighted wif red box, from there u put at the right side collumm only you drag it to the centre and name it background.


Later, make your background frame till 500 to extent because you need it till the end and make sure lock it which i highlighted how to lock it in order the words background wont b moved when u try to shift your typography.


2ndly, create another new layer for the following steps, i highlighted with yellow box to determined where i should stop by pressing F6 , on the layer there right click it and select create motion preset.Later choose frm the begining of the frame select where u wan to put your typo and go to the end select where u wanted to end.


After that, create new layers follow the steps that is given at  step1 then still following the same method as clicking F6 to start and to end a frame and then RIGHT click between them and choose create motion preset  and move and expand whichever u desired.


 Later, create another new layer for the following one, now this one starting to get tricky, why is said dat? because i wan the ''tumpahnya'' the P, i wan to make it long and fall down motion. so i used a shape tool and choose reactangle and make it like P in order to make it as if the P is falling down.


 Later, create another new layer in order to make the ''P''  fall  and its like pouring if you can see closely. Ok here how i did it, after the previous layer i drag down and until the extent i wanted, i enlarge the poured to make it as if it's really pouring down.

Alright the hardest part is over, then still continue to to the following steps as click F6 from the begining and till the end that you desire and clicked create motion preset to motion your photography


 Later , in order to make the typo go up slowly one by one. you still have to following the following steps as well, also create motion preset the move from the begining till the end.


Now's the most tricky part i wanted to do...i make R-A-J-A but i dun wan the words stay after came out, so what i did is, start with R, i did F6 begining and end F6,later F6 AGAIN on the same layer as R............... R's ending to make it appear immiedietly and R dissapear after ending, u might dont understand what i meant bt after u watch my video u might understood


 Soon, this will be the ending,ok i still use the following steps previously used..but this time, different abit,  after used create motion preset, i click window and choose motion presets to do my ending..


Monday, February 14, 2011

Video FLASH

Adobe Flash (3rd sem)

Hi..im back again with more surprises and tutorials...;3, i would be learning Adobe Flash this third sem. So today my Flash theme is ''The Fantastic Four''

Above is a square which would out after u clicked the Adobe Flash, later choose the above which highlighted


Later go to file then search IMPORT>>den find Import to library


After clicked, you would saw this square, and since my theme is ''The Fantastic Four'',
i would be choosing this 4 picture from my desktop


Later you will find picture from the library

 Later change the timelength setting to 12.00fps and change the background layer NAME


 Go to document properties and change it properly 400X250


Drag the background from the library to the white colour paper page which has set to 400X250
and arrange it 


As you can see, after background layer, then comes to picture 1 from the library later use ''move tool'' to turn -21 degree and u will see it tumble to the left side

Later do another layer which u can see down there small box at the left btm, it would appear
another 1 then drag picture 2 into it and set it to 12th frame

Later repeat the same step, and this time make it to 24th frame
Repeat the same step and this time change it to 36th frame

Later create another new folder to put all the pictures inside a picture folder to ensure that nothing goes wrong.Later create another layer type FONTS to suit the theme.


Tuesday, November 16, 2010

Retouched E-wallpaper


My final retouched E-wallpaper

Retouched Process E-wallpaper

As you can see above, is a retouching so called more updating process on my work
i add a new layer, '' CURVES'' to make the density go higher which is more darker


After that, another layer for ''Colour Balance'' i make it more blue to make it more lively

 Later, resolution changed it to 72 and that's it

Monday, November 1, 2010

Festival-Duan Wu jie(dumpling rice festival)

hiehie, gud evening....after  weeks of thought, i finally wanted to do a Festival (Dumpling rice Festival). Many people would thought other festival than this festival because it's not so common to think about. But for me i chose it because of less common and i can make it to unique and superb OUT of this festival .
So here's the festival(Dumpling rice festival) of a little  history before u see my E-wallpaper.


Duan Wu Jie is a widely celebrated festival amongst the Chinese, to pay respect to the patriotic poet, Qu Yuan (pronounced as Chue Yuan). The legend involves a really long and complicated throne-fighting war and political history. But to make a long story short: Qu Yuan was an important minister back in Chu Kingdom in ancient China. He had been known for his loyalty for the emperor of Chu, and loved his country greatly. However, His Majesty had not taken Qu Yuan's advice seriously, and he eventually got himself trapped and captured in a foreign land by his enemies, which then lead to his own death.


Sad and angry at the corrupted, dying Kingdom, Qu Yuan tied himself to a big rock and threw himself into the River of Puo Luo. The people then made rice dumplings wrapped in bamboo leaves and threw them into the river. They believed this would stop the fish from eating Qu Yuan's body. Some would even row down stream in a boat, beating drums and shouting out loud in the hope to scare the fish away (it was believed that it is how the Dragon Boat event is related to the festival.

Since then, the 5th day of the 5th month in the Chinese calendar has been set as Duan Wu Festival to remember the incident. Although there were versions of legends and stories that indicate Duan Wu has existed way before Qu Yuan's death, the tradition still carries on.


E-wallpaper


Process of my E-wallpaper
As you can see, this images is get from this link which i highlighted to set as
my background.


So i had copied the images and set as my background as you can see
from the layers


Next i take Qu yan as my images that is related to my Festival 
here's the link which i took from.


Later u pull the images into the photoshop, and zoom it as near as possible
to do the croping.


Use '' Pen tool'' to crop it nicely after Zoom as near as possible.


Later use ''Pen Tool'' to crop the outside line till close up. If you don't know 
whether it's close up or not, you can check your History, there should be stated.


After close ups,right click on the subject u crop-ed and choose ''Make Selection''

  After clicked the ''Make Selection'', you will see dotted line over your subject. Later
press  : Ctrl + Shift +i   to invert the background of it because u wanted to delete
the background and leave the subject there.


After invert it, and press delete...you can see the background been deleted and left 
the subject itself.


Later choose image from above and choose '' Flip Canvas Horizontal '' ,
and u will see the effect been flip towards right compared with original.


Later u place Qu yan on the background and play with the Obesity itself to
make it lighter.


Later take the dumpling from the net and it's a PNG file, and applied
effect on it and choose inner glow


Next, you have to select effect, Drop shadow, Inner shadow, Outer glow


The Drop shadow right here is which i selected for my Title festival.


This is the '' Inner shadow''  which i selected


This is the ''Outer Glow '' which i selected for my Festival name


This is my final layer, I am going to put on my E-wallpaper, as you can see i highligted after i put the layer up there, i changed the ''normal'' become ''Multiply'' so that it wouldn't affect my background.


So this is my process on doing my E-wallpaper.

Monday, October 25, 2010

New Extra- layers

Sorry madam, that i did my layers progress without even showing my layer..LOL, so now im retouching a new 1 to make up for it. Hope madam can forgive my sillyness.

This is my image which i have chosen in the NET at google site, ''Bleach images'', and there you can see that i had chose my image which i already highlighted .

 I'm gonna use ''Magic Wand Tool'' for today  retouched for my images

After clicking '' Magic wand Tool'', u need to click on the white background because u just want the character (subject matter ) itself, after clicking u will see  doted line such as above .

Ltr, pressed delete on the white background which u had clicked and ta-da the effect after clicked

Furthermore, use ''Move Tool''  to move your subject matter in order to paste on the background

Before pasting to this background, u have to open a background layer in order to paste the subject matter on it

Use the ''Move Tool'' click and drag the subject matter to the background and that's it!